
| Channel | Publish Date | Thumbnail & View Count | Actions |
|---|---|---|---|
 | Publish Date not found | 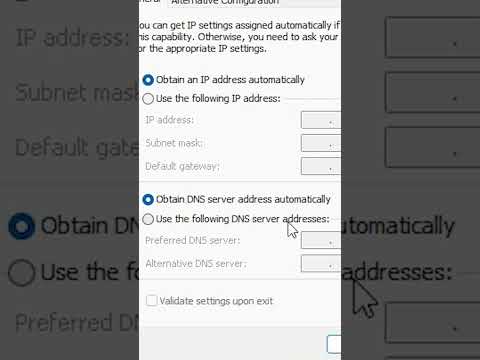 0 Views |
Quick steps:
1️⃣ Right-click on the network icon in the taskbar.
2️⃣ Select /”Open Network & Internet settings./”
3️⃣ Click on /”Change adapter options./”
4️⃣ Right-click on your active network connection and choose /”Properties./”
5️⃣ Select /”Internet Protocol Version 4 (TCP/IPv4)/” and click /”Properties./”
6️⃣ Choose /”Use the following DNS server addresses./”
7️⃣ Enter your preferred DNS server addresses.
8️⃣ Click /”OK/” to apply the changes.
Google Public DNS:
Preferred DNS Server: 8.8.8.8
Alternate DNS Server: 8.8.4.4
OpenDNS:
Preferred DNS Server: 208.67.222.222
Alternate DNS Server: 208.67.220.220
Cloudflare DNS:
Preferred DNS Server: 1.1.1.1
Alternate DNS Server: 1.0.0.1
Quad9:
Preferred DNS Server: 9.9.9.9
Alternate DNS Server: 149.112.112.112
Comodo Secure DNS:
Preferred DNS Server: 8.26.56.26
Alternate DNS Server: 8.20.247.20
️ This tutorial provides an easy-to-follow guide for users of all levels.
Questions or need assistance? Drop a comment below, and our community or our team will assist you. If you found this tutorial helpful, don’t forget to like, share, and subscribe for more tech tips and tutorials.
Customize your connection by changing the DNS server on Windows 10. Let’s dive into the process together!
#DNS #Windows10 #TechTutorial #InternetSpeed #CustomizeConnection #QuickGuide/”
Please take the opportunity to connect and share this video with your friends and family if you find it useful.


